Wednesday, December 10, 2014

The Early Prepper Gets the Egg

In anticipation of a hectic end of November/all of December, I started our winter chicken coop preparations early.  Many of you know that Michigan experienced an early "Polar Vortex" in mid-November.  It seems that my usually ridiculous planning ahead obsession ended up being the vital step in the survival of our chickens!

We consulted one of our urban farming friends about their chickens in winter.  They don't have electricity to their coop, so they just check on the water 2 times a day and break the ice off of it, and their full-sized chickens just huddle together for warmth.  Our little Bantams could probably survive this way too, but I'm hoping to keep up their egg production during the winter, and I'm too lazy to check their water twice a day in feet of snow.

I also found some blogs on Pinterest with tips for tending chickens during the winter months.  One idea was for a water warmer made from a cookie tin, a lamp kit and a 40 Watt light bulb.  It seemed worth a try.  So I purchased the necessary supplies and got to work.  The cookie tin cost 90 cents, about $10 for the lamp kit and a pack of 40 watt light bulbs.


Photo from blog link.  My photos are in limbo on a broken external hard drive.


Photo from blog link.  My photos are in limbo on a broken external hard drive.

We installed a heat lamp in the coop when we built it, with the intention of setting it on a timer over the winter to give the girls a little extra light and warmth.  However, our only electrical source has to run the heat lamp and the water warmer.  After our cold November, the water was not staying ice free on an intermittent warming schedule. We can switch to a higher wattage light bulb in the dead of winter if it seems the 40 is not keeping up, but for now, the timer is no more and the chickens are enjoying 24 hour heat lamp comfort, and ice free water.

So far, we have seen continued egg production, although not always salvageable.  A few eggs have cracked from freezing if we didn't get to them fast enough.

When we first started getting eggs, they were always in the laying boxes.  It seems that we can attribute this solely to the fake egg that I put in there.  We had to remove the plastic egg from the boxes to eliminate broody behavior in our non-laying hen.  Since then, we have found eggs everywhere.  On the ladder is one of the favorite spots.  Every once in a great while they end up in the laying boxes.  While we were gone for Thanksgiving, she laid all of her eggs in a spot directly behind the laying boxes... so close. 

Thursday, November 13, 2014

Curtains to Costumes

EOP's office group usually has a theme for Halloween costumes every year, and this year's theme was The Princess Bride.  EOP was assigned his role, as the priest who performs the marriage ceremony of Prince Humperdink and Princess Buttercup.  You know, the "Mawaige" guy.

Mawaige is what bwings us togeva today.

Eric has had some challenging costumes before (he successfully created a joker costume out of a green fitted sheet one year), but this one seemed a little more daunting than his usual garb.  There is a lot of fabric in this costume and, unless you run across a cheap pope costume, it can get very expensive to create this look.  So. Much. Fabric.

Then I got an idea.  We had some curtains on our back window that did their job, but they weren't my favorite.  They are white, so they pick up every fingerprint and every visiting dog hair.  They were covering a sliding glass door, so they were always in the way.  And the first time I washed them, they shrunk, so they were too short.  For EG's birthday, I took them down so that they would be out of the way of traffic going out onto the back deck.  I washed them, and, well, I never put them back up.  I just couldn't do it.  So here I had 4 40x84-ish inch panels of heavy white fabric that was already hemmed.  That was a good start.


I started by taking one panel and folding it in half lengthwise and sewing up the side.  Then I figured out how long it needed to be to go from his neck to the floor, and I cut out a neck hole at the top of that section with pinking shears (oh how I love my new pinking shears).  This made the panel short in the back, but this was the base layer, so it wouldn't show.

While I was working on this, I was planning out the top layer of the costume (and watching the movie, of course, because - why not?).  I knew there was some sort of tapestry fabric in our house, but I couldn't for the life of me remember where it was.  Then it hit me!  We were given 3 bed skirts for a full size bed, when we purchased the bed from our friends.  All of them are nice quality, but we only use one of them.  This red tapestry bed skirt was just sitting in storage, waiting for a purpose.  This was a perfect start to the cape layer of the costume!


I left a short side intact and I seam ripped the other 3 sides to remove the tapestry fabric.  I then, added a 3 inch strip of the tapestry to each of these sides.  To make this into a cape, I sewed a square of fabric to the front, connecting the two sides of the section I left intact.
 
The hat was a bit of a challenge.  I kept putting it off, hoping it would magically make itself.  When that didn't happen, I started by cutting out a template out of poster board.
 
 
Once I knew this was the right size for hubby's head, I cut 2 out of the curtain fabric, making sure to use the already hemmed edge to my advantage, and sewed them around the curved sides.
 
 
The whole shape of this hat made me very uneasy.  Until I added the embellishments, it was too creepily similar to a Ku Klux Klan accessory for my liking. 

 
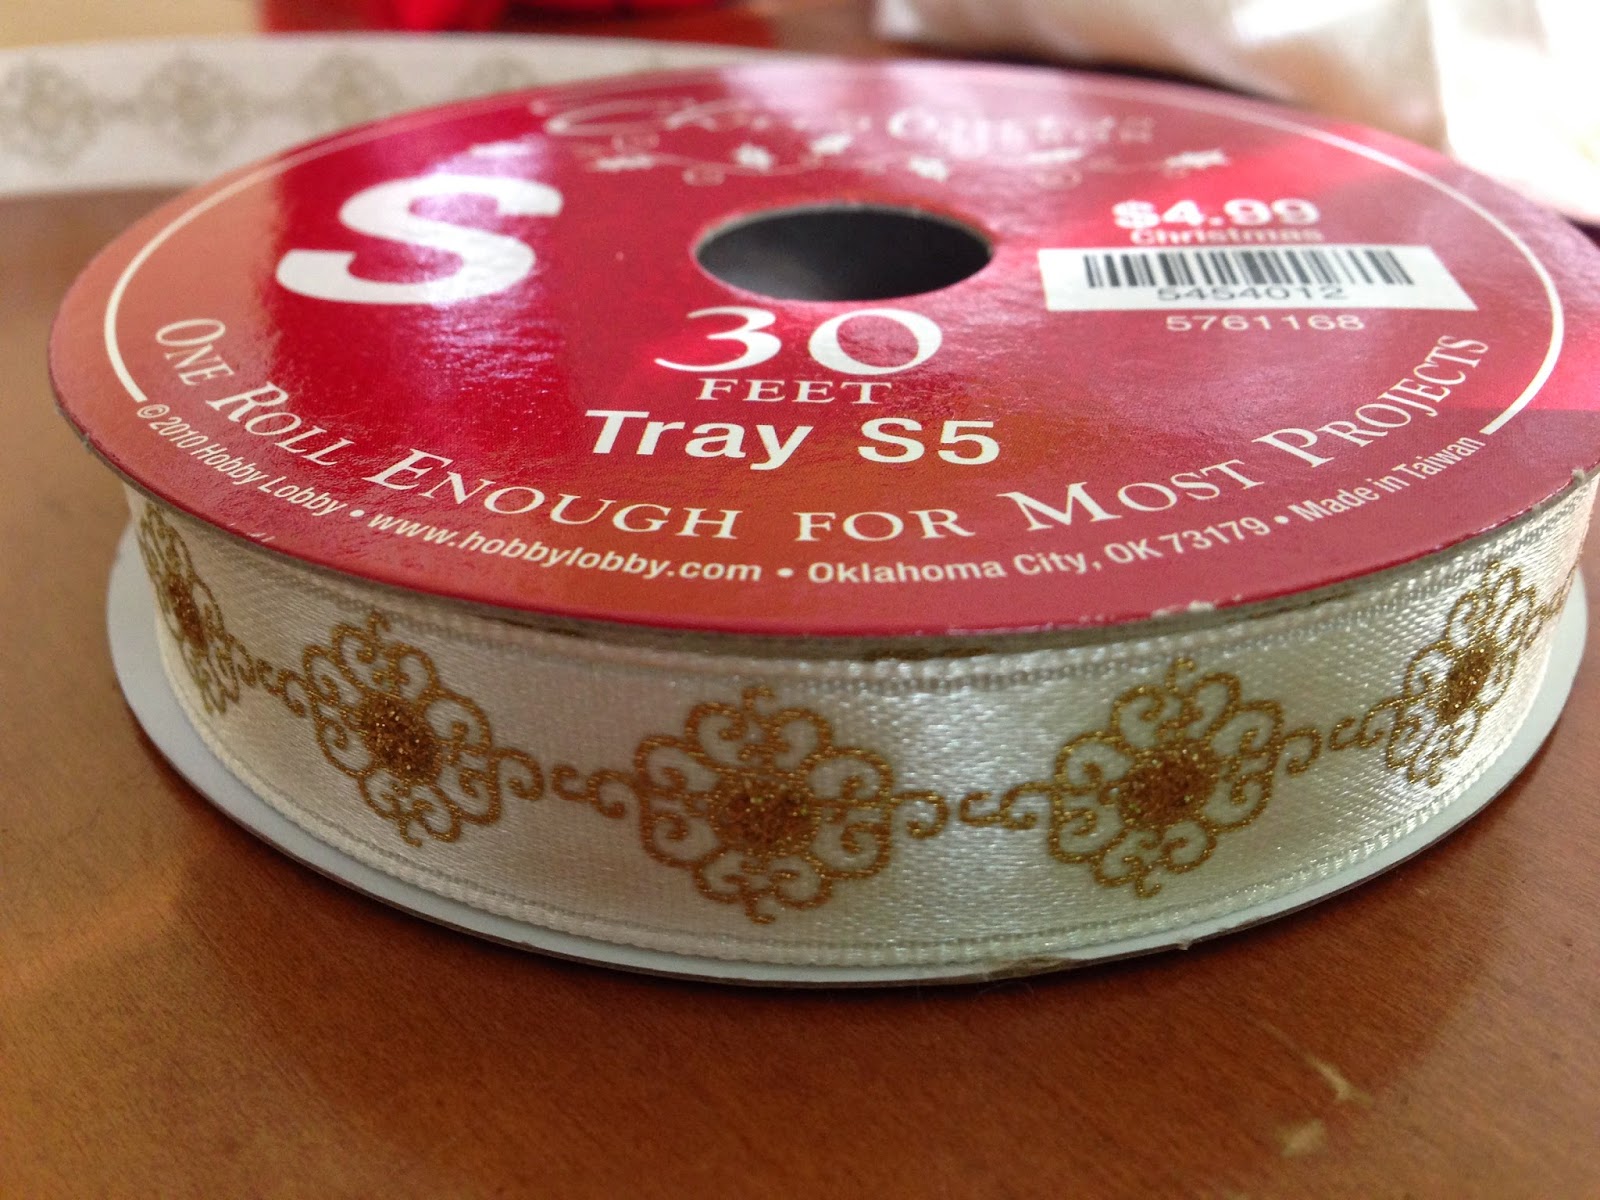
There were only 2 purchases made for this project.  One was gold trim.  Christmas at Halloween time was very helpful for finding a gold ribbon that would work for this. 
 
30 feet should be enough, right?
Then I just started adding ribbon accents to the costume.
 
On the hat to give it a more priestly look:
 
I used the curtain tie backs to make the tails on the back of the hat.
Around the neck hole of the base layer:
 

All over the cape layer:

 
Then I added the second purchase for this project, an iron-on gold cross, to the front of the hat.  I used the poster board template inside the hat to make it stand up correctly.
 
 
Here is the final look, in full make-up too.  EOP grew out his side burns and painted them silver and added some eyebrow pencil to his eyebrows to make them look a little bushier.


Not bad, eh?  All this for less than $4!  He got a lot of compliments at work too.  Everyone thought he was the pope, except when he was with the whole team.  We went in to see the rest of the team and they were all fabulous.
 
I had several people ask me what my costume was going to be.  Who had time???  I ended up dressing as a hockey fan, mostly because the hockey jersey was warm, and it was cold outside.  Also there just happened to be a game that night, so I just looked like I was in the know.  I guess I should have dressed up as Maria Von Trapp since I was making clothes out of curtains, all the while singing "these are a few of my favorite things!"

Tuesday, November 11, 2014

Costume Creations from Fabric Scraps

I usually try to make it an annual Halloween goal to spend as little as possible on costumes.  So far, I have had great success in this.  We were given an unused baby chicken costume when EG was born that fit her for her 2nd Halloween.  She wore that to one event, to the other she wore a totally retro, red and white plaid, polyester pant suit with a bonnet that was mine in 1977. 
 
Last year, she went as a garden gnome by wearing another old dress of mine (with a little Bavarian girl vibe), flower tights and a pointy hat that I made out of a $0.79 piece of stiff red felt and some felt scraps and ribbon from my basement stores.
 
This year I wanted to make an owl costume, so I found a few ideas on Pinterest.  I used this one for the feather template, but I wanted it to have wings, so I used this one for the shape of the costume.  I also knew that I would never finish the thing if I had to sew all of those feathers onto it.  So I used a gift card to buy pinking shears (to cut down on fraying of the feathers) and fabric adhesive tape (like double sided tape for fabric).  I found a selection of fabric from my basement stores that had the color scheme I was looking for and started tracing and cutting out feathers.  When I thought I had enough feathers, I cut out more and more and more.  Then I sat down and cut a small piece of tape about the width of the feather and stuck it on (leaving the other paper side on) - warning: this will ruin a pair of scissors, so use old ones that you can just throw away when you're done.
 
 
Then I found a larger scrap of fabric that was big enough to make the base of the wing "cape."  I used flannel simply because A. I had it on hand, B. it was big enough and C. it matched the color scheme.  I cut a semi-circle that was long enough to reach from finger tip to finger tip at the longest point and tall enough to reach from the base of the neck to the tailbone at the highest part of the arc (folding the fabric in half makes drawing this, and cutting this out, a little less painful).  I then sewed ribbons to the ends where the wrists would be so that the wings could be tied to her wrists and she could flap her wings.
 
Then it was time to start adding feathers to the cape.  I started at the bottom of the arc and laid out a row of feathers in a color pattern that I liked and then took the backing off and stuck them down.  I then laid out the second row, overlapping the first row and staggering the points of the feathers, and then stuck them down.  I repeated this until I was at the top, continuing to follow the shape of the arc a little bit with every row.  I then laid out a row of all orange ones to finish off the top (I'm not super happy with how that part looks, but it's not a huge deal).

 
I did the same thing with a small rectangle (about the size of her torso) and a small trapezoid (for a tail).  The orange feathers were used to make a neckline on the front torso section as well.  I attached the torso section to the top of the cape, in the center with 2 pieces of ribbon set far enough apart to fit her head through.  The tail section stayed separate and was just pinned to the base of her shirt.
 
Then there was the hat.  I found a $0.49 fleece hat at the thrift store, with the tags still on it, and in the right color.  I used 4 feathers (2 plaid for the outside and 2 yellow flannel for the inside) to make the ears (I just kind of made it up as I went until I got a shape that I liked).  I hand stitched them to the top.  The eyes and beak were made from yellow flannel (machine stitched on), white, black and orange felt (hand stitched on).


The costume was so cute!  It was nice because she could wear it over a t-shirt and pants (for the trick or treat event that was warmer than 70 degrees) or over several warm layers (for the snowy night of Halloween).


I'd say this was another successful, low-budget, super cute costume project.  I spent around $12 for the fabric adhesive tape and the hat.  Plus it cleaned out a ton of scrap fabric that I had piling up in the basement.

Monday, October 27, 2014

Fabulous Fall

October is a very busy month for us.  It's football season, and this girl loves her some football.  I am especially fond of my Chippewas of CMU, although they have surprised me this year (not always good surprises).  EG is becoming quite the little football fan herself, which I am delighted about.  She declared at the last game we went to that it was the "BEST DAY EVER!"  That's my girl.

We have also been participating in other normal fall activities, cider and donuts, pumpkin patch parties, making applesauce, preparing for Halloween (more on that later) and raking leaves.  So.  Many.  Leaves.

I have learned a few things while raking leaves this year.

1.  It doesn't matter how many lawn and leaf bags you think will be plenty, you will always have more leaves than bags.  You can always use just one (or two) more bag(s).  In the country, you just blow the leaves into the field, or the woods, but in the city, you always run out of bags.


(the leaves left after the first time raking the yard and after bagging 6 bags of leaves, it took 10 more bags)

2.  The trees will mock you while you are raking by dropping leaves on your head or dropping them where you just raked with a loud thud.

3.  The wind will mock you by destroying your neat piles of leaves before you can bag them.  See also: helpful small children.

4.  If you want to show off that you actually got outside and raked leaves during the day while your husband was at work, the only evidence of such raking left when he arrives home will be the leaf bags by the side of the road.  Another example of the trees and wind (but probably not helpful small children) mocking you.

5.  One good frosty morning, followed by a windy day can completely cover your freshly raked ground with enough leaves to fill 12 more bags, but you will only have 11.

(the second pile of leaves after the frosty/windy day)
6.  Chickens are very intrigued by leaf piles (and what's underneath them), but not people raking.  They will sneak up behind you but if you turn toward them, they will run away and hide.

 
7.  Even if I have to rake leaves, fall is still the best time of year.
 

Sunday, October 5, 2014

Which came first?

Well in our case, the chicken came first, the chick to be exact.  But one of our chickens has finally laid an egg.  We have only had one so far, but it was so exciting to find an egg!  AND it was in the laying bins where it was supposed to be! (Update: Gennie has been consistently laying an egg every other day).


After researching the 2 types of chickens we have, I have determined that the Silver Sebright (the one that acts like a rooster and I was starting to wonder about) laid the egg.  The Welsummer should lay dark brown eggs with or without brown spots.

It looks so tiny next to our eggs from the farmers market. Hopefully soon they will both be laying eggs and these tiny little guys will add up to something!


Here is what they look like inside. Two eggs is essentially the equivalent of one full sized double yolk egg.


Other fun tales in the world of urban chicken raising.  We've started letting our chickens wander the yard on a daily basis, and for a while they stayed in our yard with no trouble.  Our Welsummer only has one wing, so she is flightless, but our Silver Sebright was sticking to the yard pretty well.  One day I did find her on top of the chicken run, looking in the window of the coop, and we wondered if she would try to be a little more adventurous.  And then it happened.

One evening, our neighbor knocked on our front door and told us Gennie was in his back yard.  They noticed her when they let their dogs outside and they stopped in their tracks because they'd never been able to get that close to our chickens before.  EOP went over and caught her and brought her back over.  They had to be locked up until we figured out a solution.

After searching the web and polling our chicken raising friends, we clipped one of her wings.  They only had to stay confined in their chicken run for 2 days before we clipped her, but they were so excited to get back out in the yard!  So far, we haven't had any other problems.

Monday, September 29, 2014

Creative Birthday Parties - Part 3b: Food

We officially have a 3 year old!  In the previous post, I talked about the decorations for our Daniel Tiger birthday bash, this post is about DT themed food.
 
Food:
 
So.  Much.  Food.
 

I always make too much food, and this year was no different.  But the ideas start flowing and I CAN'T STOP making food!  Case in point - we had 2 cakes. 

1.  Tiger Smoosh Cake (Episode 101: Daniel’s Birthday/ Daniel’s Picnic), made from boxed spice cake, orange colored cream cheese frosting and chocolate syrup stripes, and then packaged to go home with party guests.

 
 2.  A vegan chocolate trolley cake (we have a friend with egg and dairy allergies), with white canned frosting, decorated with red sugar, lemon wafer cookies, cherry Twizzlers and red decorator frosting.  Daniel Tiger and friends stood in front of trolley and helped hide my "artistry."  I used this trolley cake to model mine after, except I used a 9x13 pan, cut the cake in thirds and stacked them up.
 

In addition to cake and some assorted candies on the dessert table, there was:

Banana muffins (Episode 108: Something Special for Dad/ I Love You, Mom).  I made them eggless by adding 3t applesauce instead of 1 egg.


Oatmeal with Blueberries Cookies (Episode 117: Good Morning Daniel/ Goodnight Daniel).  These were not eggless, but they were dairy free.  I used the recipe my mom used when I was a child.  Usually we add chocolate chips, but I added dried blueberries instead.
 
 
3/4 cup shortening
1 cup brown sugar
1/2 cup sugar
1 egg
1/4 cup water
1 teaspoon vanilla
1 cup flour
1 teaspoon salt
1/2 teaspoon baking soda
3 cups old fashioned oats
 
Preheat oven to 350 F
Beat shortening, sugars, egg, water and vanilla together until creamy.  Sift together flour, salt and soda.  Add to creamed mixture and blend well.  Stir in oats.  Stir in dried fruit or chocolate chips (about a cup).
Drop dough by the teaspoon onto a greased cookie sheet.  Bake for 12-15 minutes.

Now for the main course foods:

Spaghetti noodles with either chicken and broccoli in homemade alfredo sauce or marinara and meatballs (Episode 113: Daniel Waits for Show and Tell/ A Night Out at a Restaurant).  They were both yum, yum, yummy in our tum, tum, tummy!


Veggies and dip (Episode 116: Be a Vegetable Taster!/ Daniel Tries a New Food).


Honeycrisp apples, pears and caramel dip (Episode 112 – Fruit Picking Day/ Daniel is Big Enough to Help Dad).


The only food that is often referenced in the show that we were not able to use was strawberries.  We have an allergy in the house, but we love them, so we try not to tempt the allergic.  So no strawberry pancakes (Episode 109: A Trip to the Enchanted Garden/ A Trip to the Crayon Factory) or strawberry birthday cake (Episode 135: Daniel Gets a Cold/ Mom Tiger is Sick).

I have to say, the party went off so very well.  I am always relieved and disappointed when the party is over.  It is so much fun to plan and brainstorm and look on Pinterest, but I am always ready for a break after it's over.

Saturday, September 27, 2014

Creative Birthday Parties - Part 3a: Decorations

For the 3 year old birthday party, we had a Daniel Tiger themed party, on a beautiful sunny day.  We were able to keep all of the kiddos (and most of the adults) playing outside in the yard, on the deck and in the new sandbox (a birthday gift from Papa).  I took so many pictures of this party that I can't fit all of it in one post.  So this post I will discuss the decorations, the next post I will discuss the food.

Decorations:


As I said in previous posts, I took a trip to Kinkos to print banner parts, goody bag labels and tags, table tents and activity sheets.  I actually took a second trip to Kinkos and still forgot to print something (thanks to my brother-in-law for printing it for me)!

From the PBS-Kids website, I printed coloring pages and mask cut-outs for activities to keep little hands busy.


The goody bags had crayons (Episode 109: A Trip to the Enchanted Garden/ A Trip to the Crayon Factory), bubbles (Episode 117: Good Morning Daniel/ Goodnight Daniel), a Hot Wheels car (Episode 110: Daniel Shares his Tigertastic Car/ Katerina Shares her Tutu) and some candy.  I used washi tape to close the bags and attach the labels (I used a lot of washi tape this year).


Also from PBS-Kids, I printed pre-made banner circles and hung them a couple of different ways.


I also made my own banner circles with my Creative Memories software and printed them out to make a banner.  I had to get out some old-school CM tools to cut out the circles and the mattes.  Ah good times.  String the circles together with some ribbon, and, voila, you have a banner.


EG really loved all of the character banners.  We put them up a few days early and she kept naming all of the characters (including "my 3") and pointing out where each character was around the house.  The decoration she was most excited about was rainbow colored streamers (Episode 123: The Dragon Dance/ Teacher Harriet’s Birthday - her favorite favorite episode).  She liked to organize them in rainbow order in the packages and couldn't wait until I put them up.  We hung them from ceiling to counter (with washi tape) using them to hide stuff that we didn't get to putting away before the party started.

 
All of the plates, napkins and table coverings were from the dollar store.  Most of the streamers were also from the dollar store, but I had to purchase the colors not available there at a party supply store.  The forks and cake plates were still left over from our wedding, but we finally had to purchase more plastic cups, the wedding supply is gone.
 
I also pulled out all of my little bottle vase collection and filled them with pomp mums that look like mini-sunflowers.  I added one vase of real sunflowers too (Episode 131: Neighbor Day).
 
 
In the front yard, we put a few balloons, stuck in the ground with golf tees.  This has become a birthday party tradition. 
 

And I took advantage of our chalk board by adding a little Daniel Tiger phrase.

 
Ugga Mugga!