Thursday, November 13, 2014

Curtains to Costumes

EOP's office group usually has a theme for Halloween costumes every year, and this year's theme was The Princess Bride.  EOP was assigned his role, as the priest who performs the marriage ceremony of Prince Humperdink and Princess Buttercup.  You know, the "Mawaige" guy.

Mawaige is what bwings us togeva today.

Eric has had some challenging costumes before (he successfully created a joker costume out of a green fitted sheet one year), but this one seemed a little more daunting than his usual garb.  There is a lot of fabric in this costume and, unless you run across a cheap pope costume, it can get very expensive to create this look.  So. Much. Fabric.

Then I got an idea.  We had some curtains on our back window that did their job, but they weren't my favorite.  They are white, so they pick up every fingerprint and every visiting dog hair.  They were covering a sliding glass door, so they were always in the way.  And the first time I washed them, they shrunk, so they were too short.  For EG's birthday, I took them down so that they would be out of the way of traffic going out onto the back deck.  I washed them, and, well, I never put them back up.  I just couldn't do it.  So here I had 4 40x84-ish inch panels of heavy white fabric that was already hemmed.  That was a good start.


I started by taking one panel and folding it in half lengthwise and sewing up the side.  Then I figured out how long it needed to be to go from his neck to the floor, and I cut out a neck hole at the top of that section with pinking shears (oh how I love my new pinking shears).  This made the panel short in the back, but this was the base layer, so it wouldn't show.

While I was working on this, I was planning out the top layer of the costume (and watching the movie, of course, because - why not?).  I knew there was some sort of tapestry fabric in our house, but I couldn't for the life of me remember where it was.  Then it hit me!  We were given 3 bed skirts for a full size bed, when we purchased the bed from our friends.  All of them are nice quality, but we only use one of them.  This red tapestry bed skirt was just sitting in storage, waiting for a purpose.  This was a perfect start to the cape layer of the costume!


I left a short side intact and I seam ripped the other 3 sides to remove the tapestry fabric.  I then, added a 3 inch strip of the tapestry to each of these sides.  To make this into a cape, I sewed a square of fabric to the front, connecting the two sides of the section I left intact.
 
The hat was a bit of a challenge.  I kept putting it off, hoping it would magically make itself.  When that didn't happen, I started by cutting out a template out of poster board.
 
 
Once I knew this was the right size for hubby's head, I cut 2 out of the curtain fabric, making sure to use the already hemmed edge to my advantage, and sewed them around the curved sides.
 
 
The whole shape of this hat made me very uneasy.  Until I added the embellishments, it was too creepily similar to a Ku Klux Klan accessory for my liking. 

 
There were only 2 purchases made for this project.  One was gold trim.  Christmas at Halloween time was very helpful for finding a gold ribbon that would work for this. 
 
30 feet should be enough, right?
Then I just started adding ribbon accents to the costume.
 
On the hat to give it a more priestly look:
 
I used the curtain tie backs to make the tails on the back of the hat.
Around the neck hole of the base layer:
 

All over the cape layer:

 
Then I added the second purchase for this project, an iron-on gold cross, to the front of the hat.  I used the poster board template inside the hat to make it stand up correctly.
 
 
Here is the final look, in full make-up too.  EOP grew out his side burns and painted them silver and added some eyebrow pencil to his eyebrows to make them look a little bushier.


Not bad, eh?  All this for less than $4!  He got a lot of compliments at work too.  Everyone thought he was the pope, except when he was with the whole team.  We went in to see the rest of the team and they were all fabulous.
 
I had several people ask me what my costume was going to be.  Who had time???  I ended up dressing as a hockey fan, mostly because the hockey jersey was warm, and it was cold outside.  Also there just happened to be a game that night, so I just looked like I was in the know.  I guess I should have dressed up as Maria Von Trapp since I was making clothes out of curtains, all the while singing "these are a few of my favorite things!"

Tuesday, November 11, 2014

Costume Creations from Fabric Scraps

I usually try to make it an annual Halloween goal to spend as little as possible on costumes.  So far, I have had great success in this.  We were given an unused baby chicken costume when EG was born that fit her for her 2nd Halloween.  She wore that to one event, to the other she wore a totally retro, red and white plaid, polyester pant suit with a bonnet that was mine in 1977. 
 
Last year, she went as a garden gnome by wearing another old dress of mine (with a little Bavarian girl vibe), flower tights and a pointy hat that I made out of a $0.79 piece of stiff red felt and some felt scraps and ribbon from my basement stores.
 
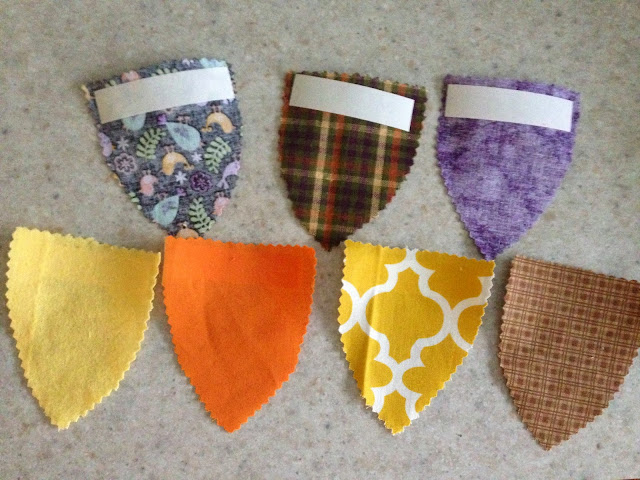
This year I wanted to make an owl costume, so I found a few ideas on Pinterest.  I used this one for the feather template, but I wanted it to have wings, so I used this one for the shape of the costume.  I also knew that I would never finish the thing if I had to sew all of those feathers onto it.  So I used a gift card to buy pinking shears (to cut down on fraying of the feathers) and fabric adhesive tape (like double sided tape for fabric).  I found a selection of fabric from my basement stores that had the color scheme I was looking for and started tracing and cutting out feathers.  When I thought I had enough feathers, I cut out more and more and more.  Then I sat down and cut a small piece of tape about the width of the feather and stuck it on (leaving the other paper side on) - warning: this will ruin a pair of scissors, so use old ones that you can just throw away when you're done.
 
 
Then I found a larger scrap of fabric that was big enough to make the base of the wing "cape."  I used flannel simply because A. I had it on hand, B. it was big enough and C. it matched the color scheme.  I cut a semi-circle that was long enough to reach from finger tip to finger tip at the longest point and tall enough to reach from the base of the neck to the tailbone at the highest part of the arc (folding the fabric in half makes drawing this, and cutting this out, a little less painful).  I then sewed ribbons to the ends where the wrists would be so that the wings could be tied to her wrists and she could flap her wings.
 
Then it was time to start adding feathers to the cape.  I started at the bottom of the arc and laid out a row of feathers in a color pattern that I liked and then took the backing off and stuck them down.  I then laid out the second row, overlapping the first row and staggering the points of the feathers, and then stuck them down.  I repeated this until I was at the top, continuing to follow the shape of the arc a little bit with every row.  I then laid out a row of all orange ones to finish off the top (I'm not super happy with how that part looks, but it's not a huge deal).

 
I did the same thing with a small rectangle (about the size of her torso) and a small trapezoid (for a tail).  The orange feathers were used to make a neckline on the front torso section as well.  I attached the torso section to the top of the cape, in the center with 2 pieces of ribbon set far enough apart to fit her head through.  The tail section stayed separate and was just pinned to the base of her shirt.
 
Then there was the hat.  I found a $0.49 fleece hat at the thrift store, with the tags still on it, and in the right color.  I used 4 feathers (2 plaid for the outside and 2 yellow flannel for the inside) to make the ears (I just kind of made it up as I went until I got a shape that I liked).  I hand stitched them to the top.  The eyes and beak were made from yellow flannel (machine stitched on), white, black and orange felt (hand stitched on).


The costume was so cute!  It was nice because she could wear it over a t-shirt and pants (for the trick or treat event that was warmer than 70 degrees) or over several warm layers (for the snowy night of Halloween).


I'd say this was another successful, low-budget, super cute costume project.  I spent around $12 for the fabric adhesive tape and the hat.  Plus it cleaned out a ton of scrap fabric that I had piling up in the basement.