Sunday, August 24, 2014

Celebrating Love's Patience


Love is patient.  This was a perfect theme for the wedding we attended this weekend.  It was a great weekend of celebration and such a blessing to be a part of.

I have known Suzanne since college.  We were in Intervarsity Christian Fellowship together during school.  She became staff for IV after college and I started volunteering with IV.  She is the kind of friend who, no matter how long it has been, is so easy to talk to and have fun with.  We share a love for football, especially our alma mater, and pizza.


We also shared a similar struggle after graduation, being single in a post collegiate world.  We both talked about being a single girl in our twenties, late twenties, turning 30 and being single, in our mid-thirties...

I got married in 2010 and Suzanne was there.  Celebrating with me, wearing the latte dress with the persimmon belt that I asked her to wear, carrying the fall flower bouquet that I made for her while she helped "process" the rest of the flowers for my wedding.

In March, Suzanne came to my birthday party, and she brought a date (!!!).  A very nice gentleman that I didn't really get to talk to, but EOP did and thought he was cool.  Then we met for lunch in April and I asked her how things were going with Nathan and she said great (!!!), like late summer wedding great.  A week later, she sent me a text with a picture of her new engagement ring (!!!).  The date was set for August, a short 4 months away (yay for short engagements).  Late summer wedding it is!

I was so honored that she asked me to help her out with her wedding by handling her flowers and coordinating the ceremony logistics (helping out with gathering people for photos, pinning corsages on people, running errands, cueing people's entrances).  I was also so excited to return the love that she had given me when I was getting married (and all of our friendship before and after).  We talked details and I ordered what we needed.  The wedding colors, turquoise and coral, were so bright and cheery, I was so excited to see the final product!

The fun began last weekend when I stayed at her house for the bachelorette party.  On Sunday, we worked on some wedding projects, including custom color M&M favors and chalkboard table numbers.  Since I was on a roll with chalk boards, I volunteered to handle those.


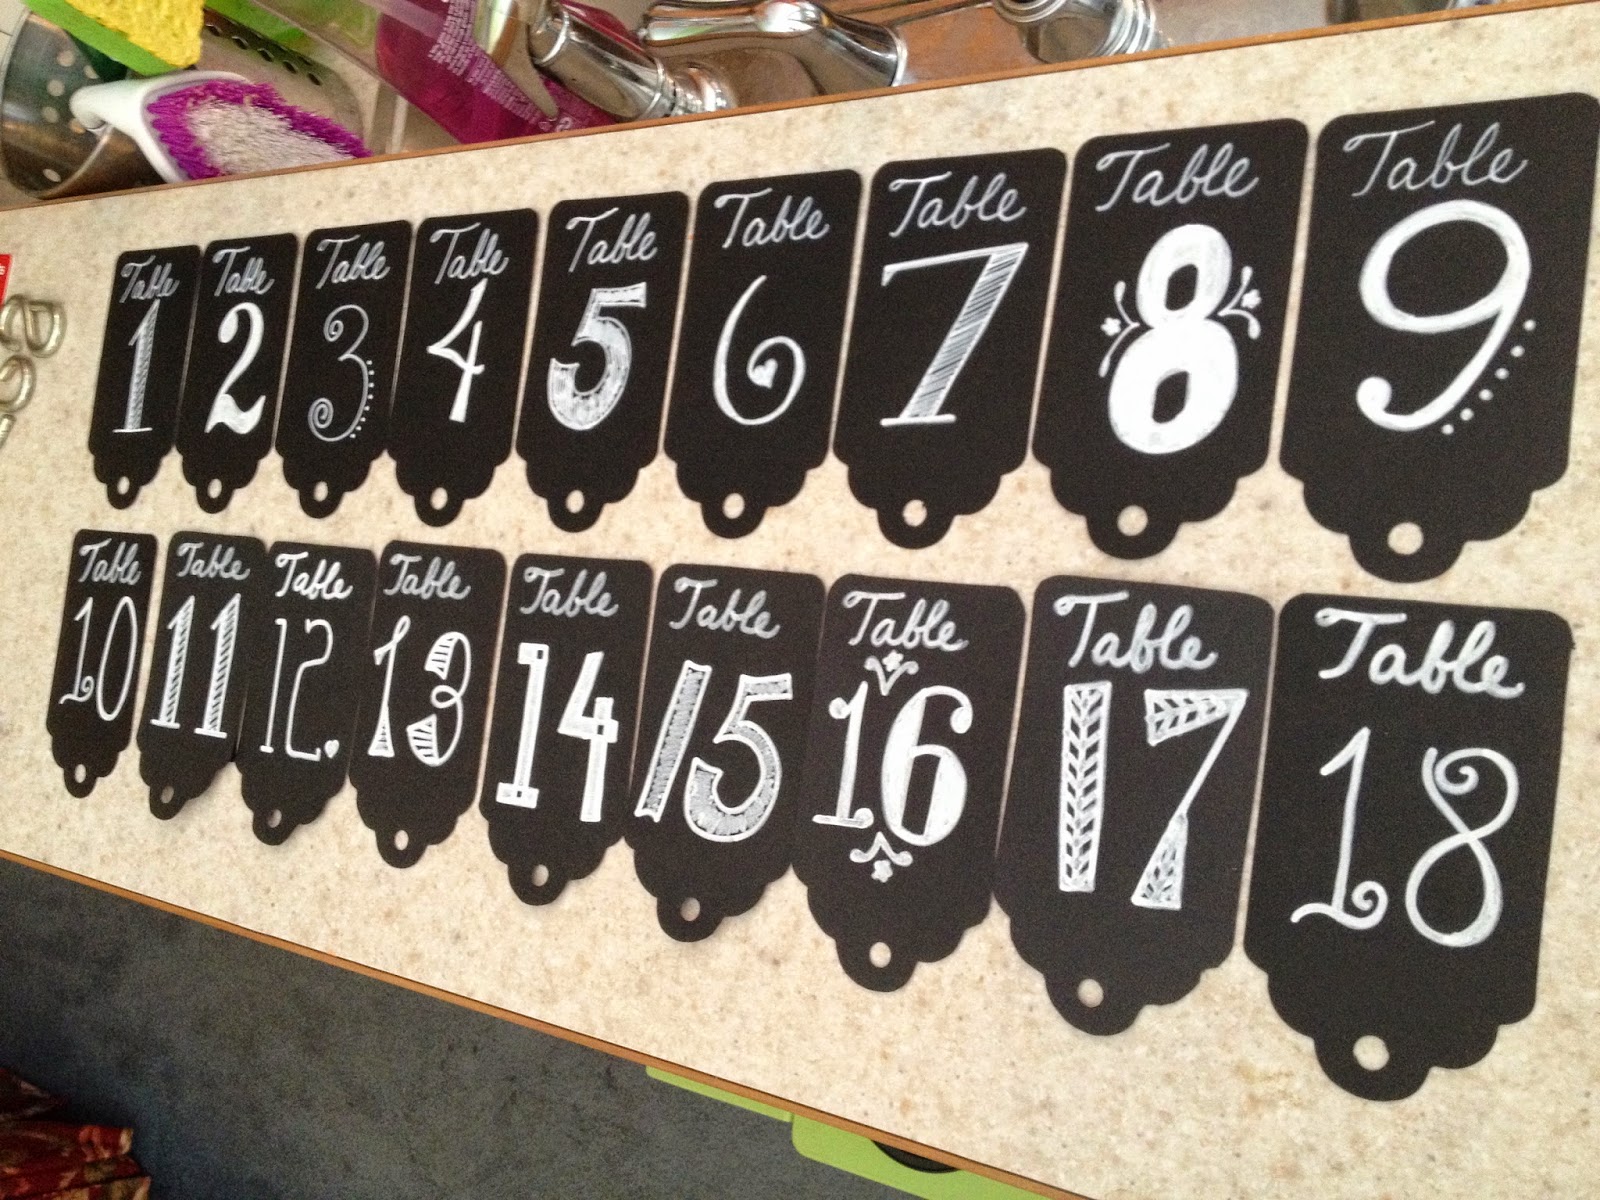
They looked so awesome nestled in the hydrangea centerpieces.  The only thing that would have been better is if my fine tip pens (both of them) did not quit working at the same time, right around number 9.
 

On Thursday, I picked up all of the flowers for the wedding from my favorite farmer's market in Lansing, Horrock's.  I have been ordering flowers from them for about 15 years, so we have a great relationship.  Plus they have a great selection of cut flowers to choose from.  We used white hydrangeas at the reception and an assortment of orange and pink flowers in the bouquets.  I ordered the extra flowers, like the corsages and the dad's boutonniere, from them too.  I am not a huge fan of making corsages, they are tricky.


The bride carried a hand-tied bouquet of peach roses, free spirit roses (such an amazingly fragrant and lovely flower), coral spray roses, orange waxflower, and peach and orange hypericum berries.  The stems were wrapped in aqua ribbon.  The maids carried hand-tied bouquets of the same, without the waxflower and with pink spray roses added, and the stems were wrapped in orange ribbon.


The orange flowers popped so well against the turquoise bridesmaids dresses.  Such a beautiful wedding color combination.  Beautiful bride, beautiful maids, beautiful day.

 
Congratulations Nathan and Suzanne, your wedding was beautiful and the party was super fun!  May God bless your marriage and future together.  I'm looking forward to our October football game with pizza after!
 

Sunday, August 17, 2014

Babies and Bachelorettes

Oh what a busy weekend it has been!  I've been anticipating the fun that we would have this weekend for a while and I'm so excited to finally be able to post about it!
 
EOP's brother and his wife are expecting a new baby.  As is the trend these days, they had a gender reveal party to find out if they were having a boy or a girl.  I was double booked for Saturday (the day of the party), so I was given the task of setting up the reveal surprise.  I was given some guidelines, ideas and a sealed envelope with the gender of the baby written inside.  It was really fun to be the only one who knew what the gender was for a whole week, but also very tricky because I had to constantly watch my words.
 
First I had to find a box, big enough to hold a dozen or so balloons (pinks or blues).  Local Home Depot to the rescue.  I got a gigantic outdoor furniture set box from their recycle center, a little beat up and missing the top, but just about what I was looking for.  I took it home and reassembled it as best I could.  It was still too tall, so I scored the sides at the 3' mark and folded it down to make a new bottom of the box, flipped it over to make the old bottom the new top.  Then I covered the whole box with brown craft paper.
 
Next was to make a sign for the outside front.  Enter more of the chalk board vinyl, cut into a heart shape.  Then to draw the sign, I purchased some permanent chalk markers from Target.  A lot of fretting and checking Pinterest for ideas, and voila, this is what the final product looked like!
 

I then added some ties to the top of the box to hold it closed during transport and to keep curious eyes from getting an early peek at the results.  Here is the final box all ready to go!


What I quickly realized was that I needed a partner in crime.  An uninterested third party, if you will, to help me take the box out of the back of the van, load the balloons in it, and load the box back into the van.  Enter my friend Lynn.  I'm so thankful that she was free to help me out because it was quite a task!

 
Who knew finding balloons could be so tricky?  After going to 3 different stores for balloons, we finally found what we were looking for.  We threw a few balloons in the bottom of the box, filled with conventional air, for the kids to play with after the balloon launch and then stuffed 10 helium balloons into the box and closed the lid.
 
The party timing worked out so that I was able to be there to take photos of the reveal!  We first voted on what they were going to have.  Most people thought the baby would be a boy (8 for boys and 6 for girls), but both parents thought it was going to be a girl!  Then they opened the box and found out that... 


... they are having a girl! We are all so excited to meet little baby L later this year!


Then I was off to event #2, my friend Suzanne's bachelorette party!  She is getting married next weekend and we are so excited for her!


  What a fun day/night of celebration of God's goodness.


Wednesday, August 13, 2014

The Tomato Tale and Other Backyard Stories

The garden is finally starting to produce!  This year we planted 3 tomato plants, two red beefsteaks and one yellow variety.  The plants are huge!  I started pulling the tomatoes a day early to ensure we get to eat them.  I was able to make this from our garden (except for the mozzarella, still looking for a way to get that fresh from our backyard).


Mmmm, fresh caprese Salad
 
These are our insanely tall and tippy tomato plants.  I can't keep them upright, not with a 48" tomato cage, or with a stake driven into the ground with a 48" tomato cage zip tied to it.  They are out of control, but they are producing tomatoes, so I'm not going to mess with them.  The middle one tipped over and the top branches broke, so now we have a bunch of green tomatoes - I see fried green tomatoes in our future.
 
 
Don't you love our rainbow of tomatoes (and one jalapeno) on the windowsill?  Yummy yummers.  There was a time - a long time - in my life when my response to tomatoes would not have been yummy yummers.  I used to dislike them greatly.  I was that girl who always special ordered everything with no tomatoes.  But around 2008, I discovered the beauty of the garden fresh tomato.  I was forever changed.  Now I very rarely ask for no tomatoes in food, unless they are cherry tomatoes - those still have too many guts for me, or as Miss Elaina (Daniel Tiger reference) would say they are too squirty for me.  In fact, my lunch today was a yellow and a red tomato, sliced with salt and pepper - so delicious.
 
Our compost always tends to give us extra plants that we can replant in appropriate locations (like the raised garden or in a spot not directly under the tomatoes).  Usually we have a lot of tomato plants and squash plants.  We have an extra grape tomato and roma (I think) tomato plants.  The squash plants are always a mystery until they start producing squash.  We've had (unplanned heirloom?) spaghetti squash, zucchini, yellow squash, and whatever this is.  The flower falls off of these, but nothing starts to grow/something is eating them, so we haven't been able to identify it yet.  Please excuse the weeds, I haven't gotten out there in a while to take care of those, plus this plant has spines, so I'm not going to mess with stuff underneath it.
 
The yard is also blooming.  We've done a lot of work to this yard in the 4 years we've been here, but this year may take the cake.  We've pulled out 3 large (overgrown) bushes from various locations along the fence and pulled some other invaders that required heavy machinery to remove.  Also we filled in some low spots along the fences (with a high spot under one of the bushes) and planted grass seed.  It's starting to finally look like someone cares around here.  These are the flowers in bloom right now.


Monday, August 11, 2014

All Kinds of Crafty

I've been busy with all kinds of craft projects lately.  In addition to making 2 diaper bags this week, I've also done these craft projects:
 
EG will be turning 3 soon, so we've been painting and decorating a 3 for her photo shoot and then her wall (We made a 2 last year and the picture with her holding it hangs in her room with the 2 hanging above it). 


After a trip to the craft store dollar bins for some finishing touches, we have a finished product.  I will probably use some hot glue to add a ribbon to hang it on the wall closer to her birthday.  But for her 3 year photos, I don't want the ribbon on it.  It will also make a great decoration at her 3rd birthday party, since the theme is Daniel Tiger's Neighborhood and this looks an awful lot like Katerina Kittykat's color scheme (especially when she is wearing her pink tutu).


I found a great deal on rolls of chalkboard sticky vinyl on Tanga.com.  I've been finding all kinds of uses for it.  The original idea was for our toddler's wall for coloring.  But so far, I've found 3 other places to use it:

1.  I stuck an 8x10 rectangle of it to the door to the garage and placed a frame over it.  This will be for messages and reminders before heading out the door.  I found the frame in the frame drawer (yes we have a frame drawer) and took the glass and back off of it.  This particular frame was made by my grandfather and I've been wanting a way to use it, but the back didn't stay on it very well, so it was a little dangerous to hang on the wall with glass in it.  It also has a little ledge inside for the chalk to sit on.


2.  I found another old frame in our frame drawer and stuck the vinyl to the outside of the glass.  Now it sits in our guest room to say welcome.
 

3.  I took a small square of it and stuck it to the top of the washing machine.  This will make it easier to remember what is in the washer that should not go into the dryer, for me and for EOP, who doesn't always remember that everything doesn't go in the dryer.
 
I'm sure I can come up with many more ways to use this stuff.  The possibilities are endless!

Saturday, August 9, 2014

Easy One Evening Sewing Project

I've been waiting to post this until a friend had her baby, so that I didn't ruin the surprise of this little gem.


Welcome to the world, baby C.  You are a super cute baby and you and your mama will rock her new diaper bag!
 
I've been making this diaper bag for baby shower gifts since I found the pattern in Simple Sewing for Baby by Lotta Jansdotter while I was pregnant.  I made one for us and we used it so much, we wore it out.  It's fun to pick out fabrics that fit the personality of the mom.  Hobby Lobby has so many cute fabrics, I always have a hard time narrowing down to 2!  Then I get to pick out a cute button to match the whole ensemble.  This one is one my very very favorites so far.  I found these awesome sparkly pink buttons and I can't wait to use them again!
 
I have the material to make another bag, simply because I could not walk out of the store without buying this material.  It was calling to me - MAKE A BAG OUT OF ME, PLEASE! 
 
I know!  Cute, right?
 

Since this bag pattern and directions are already in the book, I will only show you the pictures of how I made it and the modifications/short cuts to the original pattern that I have made.
 
1.  The bag can be made from 1 yard of fabric.  I think that with one kind of fabric, the measurements can be done in a way to follow the selvedge correctly.  However, I always like to use 2 complimentary fabrics, one for the body, one for the pocket.  I'm not sure that I am always following the selvedge rules correctly because I usually buy 1/4 yard of the pocket fabric and 3/4 yard of the body fabric.  I haven't had any problems with them yet, so I don't think it's a super big deal for this project.
 
I usually try to cut like pieces at the same time but folding the fabric in 1/2 and measuring once, cutting through 2 layers.
 
 
2.  I have added an inside pocket to the original pattern that only has an outside pocket.  This is part of the reason I don't always follow the selvedge rules.  I made the inside and outside pockets the same size this time so that I could fold the fabric in half and cut both at once.  The inside pocket is sewn on a little higher on the back of the inside and divided into 3 pockets instead of 2.  That means the inside pocket needs a finished edge on the top and bottom before sewing to the body piece (the outside pocket matches with the raw edges on 3 sides).
 
  The trickiest parts is to make sure that you pin the 2 body layers together so that the pockets are both facing the same direction.  As a rule of thumb, the bottom of the inside pocket should be on the same end as the raw edge bottom of the outside pocket.  Seems simple enough, but it always trips me up.


3.  I always make the strap 2 inches longer too, just because I find it more comfortable.
 
 
4.  I decided to use another pink sparkly button for this one and some mustard yellow grow grain ribbon that I had laying around.  I usually cut my ribbon 1 inch longer than the recommended length. 
 
 
About 2 hours later, here's the finished product!  I hope the next person, who loves owls, and that invites me to a baby shower loves it too! 


Friday, August 8, 2014

A Dish to Pass Did Not Mean Dessert - Oops

So it turns out I was supposed to bring something other than a dessert to our dinner party.  I found out after I posted my blog, but after Kelley read the post, I was given a pass since the dessert sounded so yummy.  However, I volunteered to bring another dish to make up for it.

I've been craving Black Bean and Mango Salad, EOP calls it Black Bean and Mango Salsa, which is a yummy summer treat for us.  I don't know why I only make it in summer, maybe because it's a cold salad and they always sound better in the summer.  Any-who, every summer I refresh my memory on how to make it by looking up similar recipes on the web, mostly for proportions, and then adapting them to my taste.  So this post is as much for me as it is for you because I won't have to scour the web to find a recipe.

Here is my ingredient list for a double batch:


2 cans black beans
2 mangos
1/2 large red onion (or to taste)
2 red bell peppers
the juice from 2 limes
1 bunch cilantro
2 T olive oil
salt and pepper to taste

I have this handy, dandy, little tool that I found on Clearance at Meijer for pitting mangos.  I've heard others say they didn't like it, but I use it every time I cut a mango.


After it is pitted, I crosscut the flesh in the peel and then flip the peel out and cut the flesh out of the peel (I didn't have enough hands to take that picture).  Then I cut what I can from the pit section and enjoy the rest as a treat.

Then I chop up the onion, red pepper and cilantro, add the beans, mango, lime juice, olive oil, salt and pepper.  Mix together and chill for 4 hours or overnight.

 
It tastes great as a side dish, but EOP calls it Salsa because it tastes delicious with tortilla chips too!

Thursday, August 7, 2014

Lemon Frosting and Lasting Friendships

I am going to a party tomorrow for my dear friend Janell.  She is a friend I made when I lived in Mt. Pleasant and volunteered with Intervarsity Christian Fellowship at CMU.  But I really got to know her well after she joined a small group Bible Study I was in from Mt. Pleasant Community Church.  This small group was one of my favorite things about living in Mt. Pleasant.  We were/are like family.  We celebrated much together and endured many hardships as a group.  We are still celebrating and enduring together even though we don't all live in the MP area anymore - they are some of my besties.

So Janell now lives in Phoenix and I don't get to see her nearly as much.  But whenever I get down there or she comes home to visit her family and friends, we try to hang out.  This time, it is in the form of a fun dinner party at Kelley's.


Last time I went to Trader Joe's (only one of my favorite places ever), they had a sample of their lemon frosting, which is just Lemon Curd and Mascarpone Cheese mixed together.  I really liked it and bought right into their little scheme.  So now I have the ingredients for frosting and nothing to frost. 


Enter this little gem of a recipe for Lemon Crinkle Cookies.  I found a pin on Pinterest for Lemon Crinkle Cookie Sandwiches with Lemon Frosting (ding, ding, ding - we have a winner!)


I made 16 cookie sandwiches, substituting the lemon frosting in the recipe for the Trader Joe's easy lemon frosting, and now I have a dish to pass (minus the 3 tester cookies for our family).  Hope they need a dessert!

P.S. They are delicious!